Running a little late with this, but Rhea shamed me into making Hanukah presents for the grandsons and Christmas presents for two brothers-in-law. I found a simple puzzle box in my database of ideas based on dovetails. The original incorporates a moving magnetic lock that won't be used here. The screen capture below shows the dovetails. When closed the dovetails appear to be running from side to opposite sides at right angles to the box sides.
Two cutoffs were located, one of purple heart and one of maple. The two will be a nice contrast and the purple heart is unique. In my stash of router bits I found a dovetail bit. With these in hand some careful planning and measuring should make this a straightforward project as well as provide a break from gear cutting.
A sketch was made (actually the fourth) that shows the dovetails to be cut in the two halves of the box. The square on the left has two "runners" and the square on the right has three. The dashed line is the hidden inside corner of the runner. The boxes are 3" X 3". Both of the cutoffs are 13/16" thick. The dovetails will be cut 1/4" deep. The 2" pocket hole needs to be drilled before cutting the dovetails. The holes for the magnets can be drilled after and will be sized to fit the neodymium magnets in my cache.

The plan for producing these four boxes is as follows:
Scrap blocks will also be prepared for fine-tuning the dovetail dimensions. An ideal approach to cutting the dovetails on the router table is with a jig, one that will hold the part at the correct angle and allow milling of multiple dovetail sides with the use of shims.
The wood cutoffs were cut into four 3.00" squares with the table saw and a sled fitted with stop. A scrap of 3/4" pine was also cut into three 3" blocks to serve as guinea pigs for the dovetail cutting. These blocks (sans pine) are seen below.

Trigonometry was used to determine the distances of the various dovetails from a given corner. For instance calling the left block shown above, 1, the top right corner is 0.707" from the inside bottom corner of the dovetail. The near side of the second dovetail on block 1 is 2.828" from the same corner. Rotating the block 180° sets it up for the same two cut distances completing both dovetails on block 1. Similarly, cuts in block 2 are 1.558" and 3.679" from a chosen corner.
Aligning a corner accurately and measuring from a given corner should provide consistency between blocks. I struggled with gaining the necessary accuracy from my router table, so decided to attempt cutting dovetails with a router bit in the mill. After some trial and error the setup shown below was settled on. The vee block was accurately aligned with the X-axis using a dial indicator. The finger plate was held to the table with strap clamps and a machinist's jack was placed under the block's corner in the vee block. The top and corner were easily located with the spinning router bit (straight shank for removing the bulk of material). Running the mill at its highest speed at full depth of cut, 1/4", led to a very noisy cut, similar to that of a router. Cutting the dovetails will have to wait for a time when the wife is not at home.

A number of issues arose with the first cut from significant tearout to inability to hold the cutter sufficiently tightly in the 1/4" milling collet. The killer blow was realizing that the long cut in the center of block 1 was not possible in this setup and there is insufficient y-axis travel to do the cut in the opposite direction. Time to free up the router table.
Most of the morning was spent making the jig to hold the blocks for routing. It is a simple jig that will slide against the fence or spacers against the fence and is equipped with a 90° cutout for holding the block by a corner. The two parts are held together by deeply countersunk #8 wood screws. A photo of the completed jig is shown below. Now to get the router table uncluttered and set up, a much more daunting task.

After removing stuff from the table and putting the fence in place. The jig was tried and did not work. Holding the block to be cut is one of the problems. A second is depth of cut. The router in my table is challenging at best to control depth and was not up to the accuracy required here. The project was shelved for this year.
It is now March 2026 and this project is still tantalizing me. I plan to use the Sherline mill. A path forward must exist for holding the material in such a way that cuts can be made with x-axis travel. Tearout should be manageable by taking lighter cuts and milling into a scrap. Providing holding at the back and front of the part, so it can be milled from the sides, is limited by the width of the table along the y-axis. A plate needs to be made to provide this depth. Sherline provides such a plate, seen below, but waiting for it doesn't help me today!
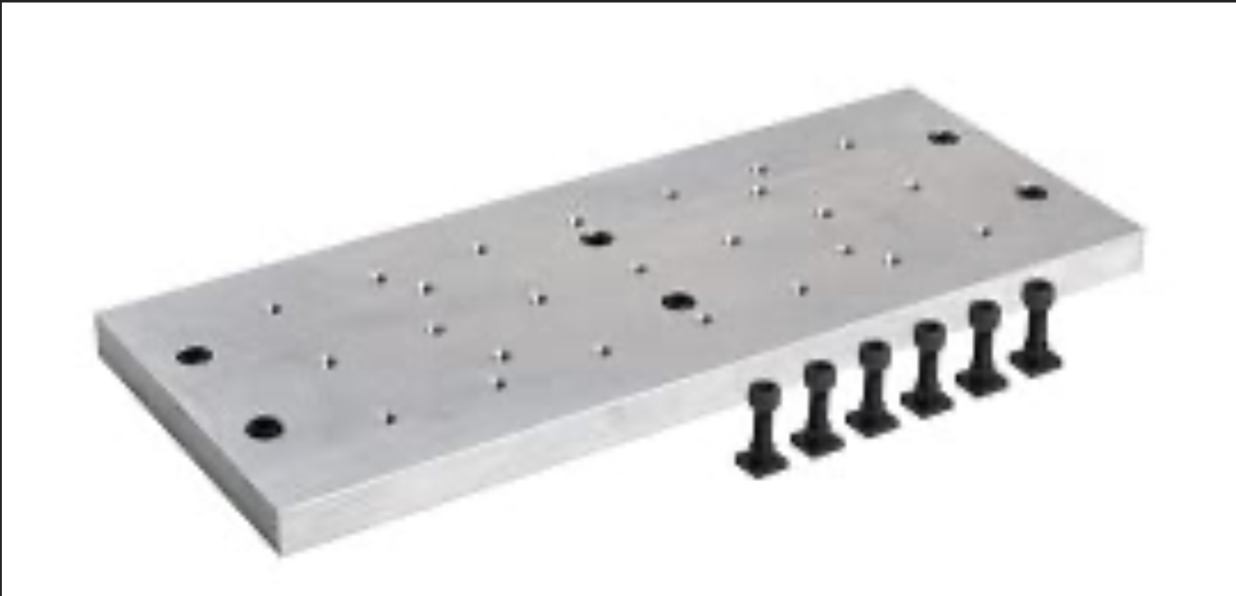
I don't have the aluminum to make a copy, so will make a wood fixture designed for this project. A project within the project. The two blocks will need different clamping setups. The left most block in the plan diagram above has two corners milled off, while the corners of the block on the right can be clamped.
The fixture begins with a plywood cutoff that is 5 3/4" X 8 1/2". Four scraps of wood were glued to the plywood leaving a 3" X 3" hole in the middle to fit the puzzle parts needing dovetails. Clamping arrangements were made at each corner with the clamps from the Sherline milling vise. Holes were drilled, #21, at each corner 3/16" from the edge of the oak board. These holes were tapped 10-32. The second photo below shows two clamps holding a block.


Examining the photo of the clamped block raises some challenges to using it successfully. The block, whose design is on the right in the diagram above, can be cut with the block and clamps as aligned in the photo above. This block is milled in two areas, above the bottom corner and below the top, both areas clear of clamps and clamp holes in the fixture. The left block from the design above presents the challenges. It is milled in three places, the two corners and across the middle. Milling the corners off, when milling extends into the fixture, destroys the fixture holes needed to clamp a block for milling out the middle!
Some math was in order, though not to solve the problem noted above. The locations of the various dovetail edges needed to be calculated more precisely than the first sketch above. The dovetails are cut perpendicular to the block's diagonal, 4.243". A second sketch below maps out the relevant distances for setting up edges.

A distance not noted on the sketch above is the depth of the dovetail corners, 0.144", since the dovetails are 1/4" deep and a 60° cutter will be used. Milling out all but the angled part of the dovetail requires the following table of offsets from spindle centered on corner, where CD is the cutter diameter.
| Block 1 | Block 2 |
|---|---|
| 0.563" - 1/2 CD | 0.707" + 1/2 CD |
| +0.985" + CD | 0.697" - CD |
| +1.147" - CD | +1.435" + CD |
| +0.955" + CD | +0.697 - CD |
There is a bit of play, < 1/32" of the block in the fixture. One corner on the fixture will be selected and all blocks pressed tight into this corner when clamping. This same corner will also be located and serve as the zero point for the above offsets.
A break was taken today to make a push stick for the table saw. My standby had broken and needed to be replaced. This 3/4" walnut version is significantly safer, keeping my fingers a good 3" from the blade. The glued on maple block is designed to be replaced, when overly chewed up. The slot was made from two holes drilled with a 1" Forstner bit and connected with the scroll saw. Rasp, file and sandpaper finished the push stick.

A 3" X 3" block of 3/4" oak was placed in the jig and clamped tight to a corner. A 0.250" center cutting end mill was placed in the collet and the top and corner of the block were located. The spindle was moved to center over the corner and then an additional 0.832". The end mill was lowered 0.05" into the wood of the fixture and then a slot was milled. The slot was finished with two more 0.10" depth cuts. The spindle was moved a further 0.10" away from the corner and the 0.25" slot widened in three passes. Widening was continued until the end mill was 1.279", a 0.447" wide slot. The end mill was switched for the dovetail cutter. The cutter was lowered until it just bottomed in the slot and then moved so it could be heard touching the edge of the slot. The dovetail was milled in three passes for a total of 0.144". This was repeated on the opposite side. The photos below show this work.


While rethinking the setup above, a realization dawned on this ever slowing brain of mine, work from the middle out. The center of a block of maple was marked with a tiny prick mark. The fixture was clamped in the fixture and the fixture clamped to the mill's table. The spindle was centered over the punch mark with the pointed end of an edge finder. The table below shows the new center based offsets.
| Cut fm Ctr | Move to | Cut to | |
|---|---|---|---|
| Block 1 | 0.5735" - 1/2 CD | 0.985" + CD | End |
| Block 2 | +0.7175" + 1/2 CD | 0.697" - CD |
The first dado was made with the 0.25" end mill as seen in the photo below. The dado was turned into a dovetail with the dovetail cutter after touching off on the bottom of the slot. The block was removed from the fixture, rotated 180° and replaced in the fixture. The second dovetail was made by again measuring from center. The second photo below shows the two completed dovetails after removing the fuzzies with a file.


A few measurements were taken from the completed dovetails. The large center portion is 1.424 - 1.428" wide vs. the planned 1.435". The width of the two parts on the corners are 0.705" and 0.713" vs. 0.707". The width at the top of the cut between the center and corner is 0.696" for both vs. 0.697" planned. Not bad! I will need to toast my success tonight with my favorite cocktail, a Manhattan.
I may have jumped the gun with a planned celebration. The purpleheart block of wood was tackled next. The punched center was located and the two corners were cut first. The spindle was offset 1.710" and a slot was cut to a depth of 0.250". The slot was widened in 0.10" increments until the corner had been removed. This was repeated after rotating the block. In both cases the last bit of corner split off, but the wood is finely grained so the depth did not change. The dovetail was cut as before.

The threaded hole near the corners just cut was just usable. The block was clamped in the fixture and the spindle centered. A 0.250" X 0.250" slot was cut across the entire block. The slot was widened in one direction by 0.357". Corner blowout was an issue, but only a bit of corner broke off. The block was rotated and the slot was widened the same amount in the opposite direction. The cutter did not progress the full width of the slot, leaving a bit of material on the corner for later removal with a file. The dovetails were cut on both sides.


Happy Friday the 13th! A very blustery, but sunny day.
The dovetailed blocks did not mate, as expected. It is difficult to determine just how far they are from fitting. Some careful measurements are in order tomorrow. The Measuring Dovetails tool from above reminded me of the procedure for the needed calculations. The aluminum rod selected is 0.251" diameter. The male central dovetail in maple measured 1.847" with rods. The calculator says the dovetail is 1.450". The top of the male dovetail is easy to measure and the calipers say 1.430. The basement is pretty cold, so maybe the male dovetail is experiencing shrinkage?

The female dovetail, more challenging to measure, measures 0.725" between rods. This says the bottom of the dovetail is 1.411". So the female is about 20 thou narrow without adding in at least 6 thou for a sliding fit. The female dovetails in the maple are both 0.963" wide, while the corresponding males in the purpleheart are 1.040" and 1.010". A much larger discrepancy, though the calipers measure them as 1.014 and 0.992". Aligning the two blocks in the two possible directions indicates a difference in the lack of fit. Attempting to insert one into the other shows the minimal filing needed, so filing will be attempted.

The lump left on one end to avoid tearout was cut off with the FatMax saw to avoid marring the bottom and the side of the dovetail. A lot of filing removed the bit of remaining material. Studying the two parts and their lack of fit convinced me to remove most of the material from one side of the dovetail, 0.030", with the dovetail cutter. A very tight fit ensued, so 0.010" was removed from the opposite side. The photo below shows the two parts pushed halfway together. The outside dovetails need attention next.

And now happy pi day! A bit of sanding with 80 and 120 grit sandpaper on the tops of the dovetails led to a nice sliding fit until the outside dovetail start to engage. It is difficult to determine how much more material needs to be removed, but it looks like more than 1/32". I will cut and test the fit often trying to get it just right.
After removing material from both sides and multiple tests, work shifted from milling to filing. The parts now slide together, though bind when mostly through. Fitting from the opposite direction is more difficult, so more filing is required. The photo below highlights an issue that appeared when the parts were fit together.

This twisting was a surprise! Should be easy to fix by trimming the sides with the table saw, something that was planned anyway to deal with the small areas of tearout. I assume the twist is due to shifting of the fixture between parts, but when checked the fixture still seems to be aligned properly. This twist is most likely responsible for an easy fit from one side and difficult from the other. These dovetails have proven to be quite the learning opportunity!
Cutting the two parts fitted together on the table saw requires some planning. The parts will want to move relative to one another. There is also no good edge to rest against a fence for the first cut. A scrap of 1/2" material was held against the fence of the crosscut sled. A locking clamp was screwed to the sled via a block of plywood. With the bottom of the two blocks against the scrap and the clamped locked about 1/8" was removed from each edge, producing a nice square. The cutting removed whatever was causing the dovetails to stick on one side. They now moves freely. The dovetails are no longer symmetrical about center, but a minor issue all-in-all.


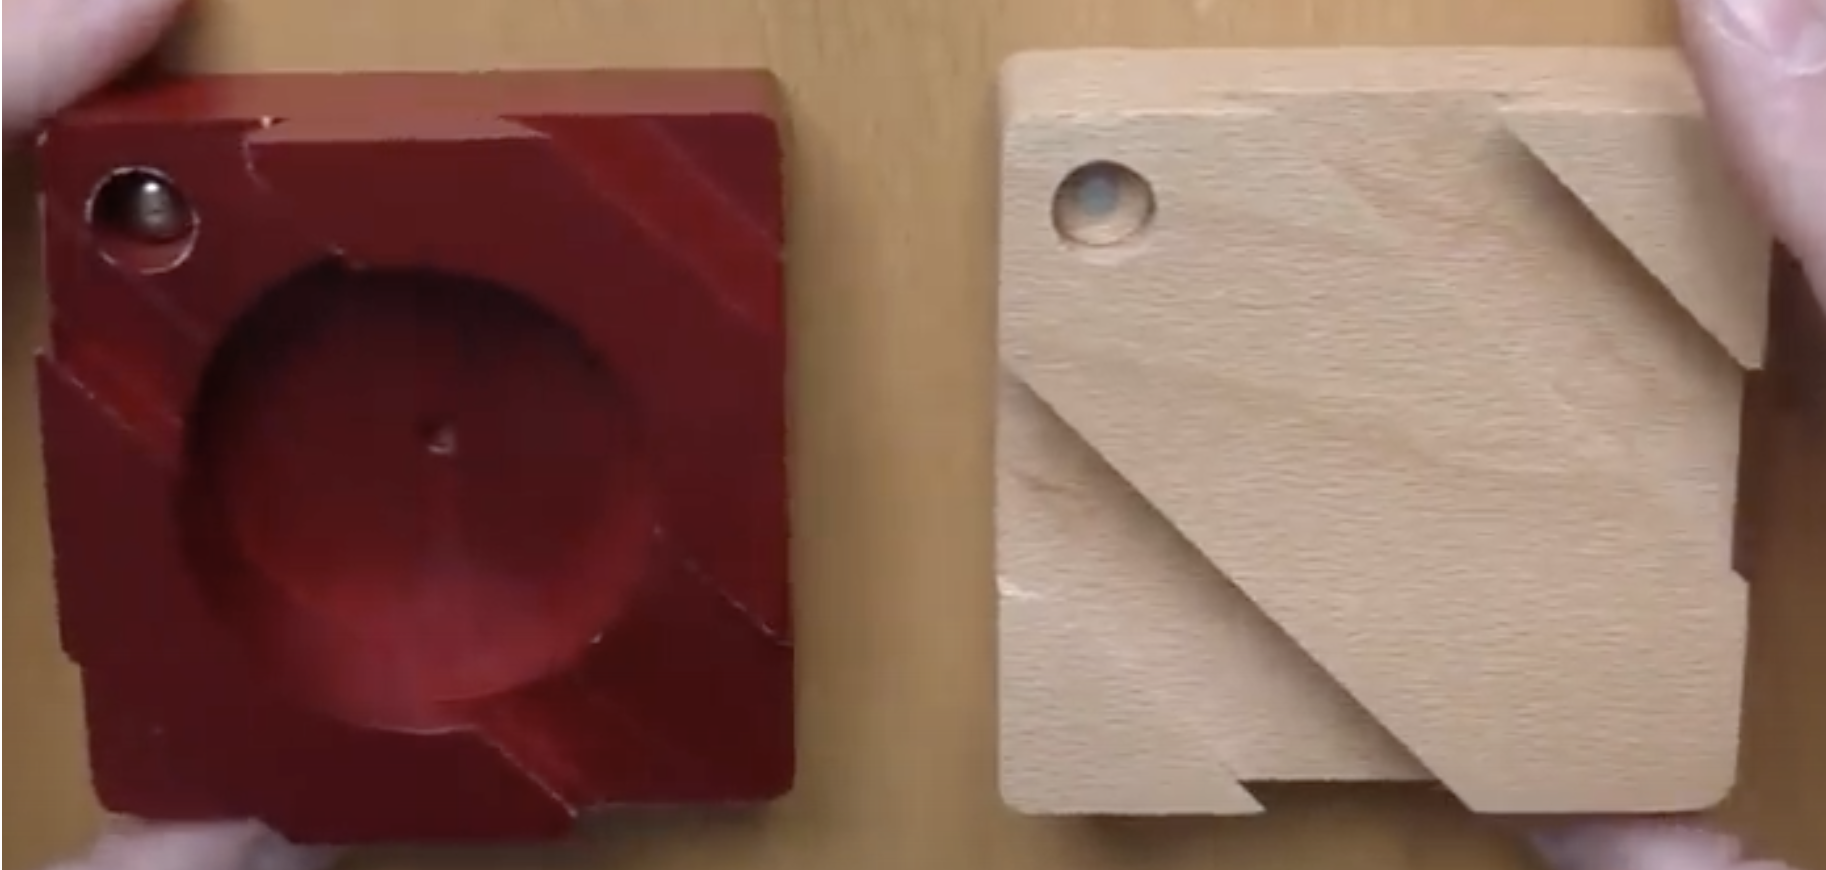
I've decided against turning this into a box as it would be a pretty useless box. Magnets will be installed to lock the dovetails shut and make the puzzle a bit more difficult to solve. Two 1/4" X 1/4" cylindrical neodymium magnets, tubes, were located. A square set of blocks were set up in the drill press to make an inside corner. A 1/4" drill bit in the chuck was set up so it was 1/4" from each of the sides of the corner. The blocks were marked on the inside for hole locations and drilled 1/4" deep when pressed into the corner. The magnets were a tight fit so were pressed partly into place by hand and then tapped home with a hammer and an intervening block of wood. The photo shows the magnets in place.

The magnets are not really strong enough to hold the two blocks together, such that fiddling does not move them relative to one another. The blocks were sanded on all outside faces with 220 grit sandpaper. The edges and corners were all slightly rounded. After blowing off the dust the outside surfaces were painted with shellac, two coats, and sanded lightly between coats.

Learned a lot about dovetails with this project, including how not to cut them. My fixture design was insufficient for the needed accuracy. Unfortunately, a simple solution like a vise would not have worked on my mill because the vise is too small. Living is learning!